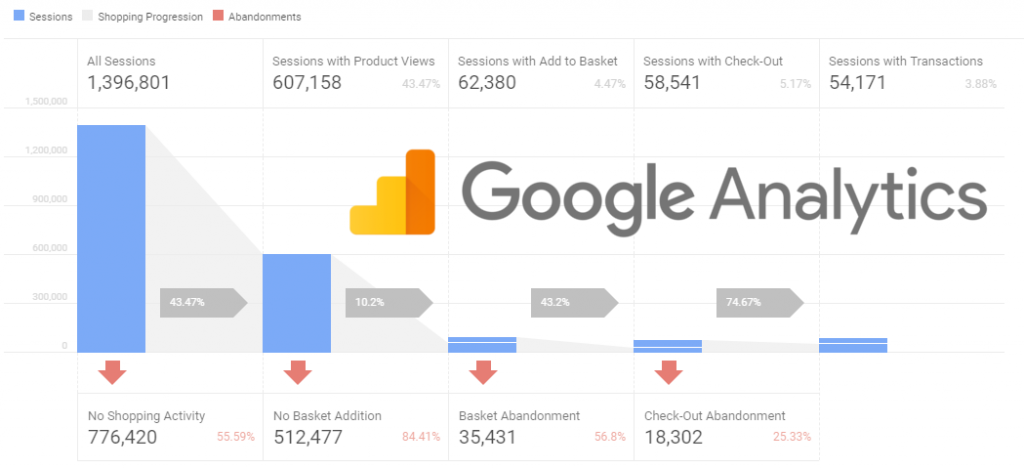
Ở phần 1 bài viết, Guru đã giới thiệu cho các bạn về định nghĩa của việc theo dõi Enhanced Ecommerce cùng một số phương thức đo lường trong Google Analytics. Trong phần 2 này, Guru tiếp tục giới thiệu các bạn biết thêm các phương thức đo lường khác trong Google Analytics, kèm với đó là rất nhiều mã theo dõi cụ thể, khá giống với mã theo dõi thực tế trên website của bạn. Bạn không nên áp dụng những mã theo dõi này trên website của bạn. Bạn nên tùy chỉnh để phù hợp với sự hoạt động website, máy chủ của bạn.
Hướng dẫn theo dõi Enhanced Ecommerce trong Google Analytics (Phần 2)
5. Đo lường số lượt xem sản phẩm chi tiết
Trong quá trình mua hàng, người dùng có thể xem trang chi tiết sản phẩm. Bạn có thể thêm mã sau vào trên mỗi trang chi tiết sản phẩm:<script>
(function(i,s,o,g,r,a,m){i[‘GoogleAnalyticsObject’]=r;i[r]=i[r]||function(){
(i[r].q=i[r].q||[]).push(arguments)},i[r].l=1*new Date();a=s.createElement(o),
m=s.getElementsByTagName(o)[0];a.async=1;a.src=g;m.parentNode.insertBefore(a,m)
})(window,document,‘script’,‘//www.google-analytics.com/analytics.js’,‘ga’);
ga(‘create’, ‘UA-XXXXX-YY’, ‘auto’);
ga(‘require’, ‘ec’);
ga(‘ec:addProduct’,{
// productFieldObject stores product click and other details
‘id’: ‘[Server Variable]’, // Product ID/SKU – Type: string
‘name’: ‘[Server Variable]’, // Product name – Type: string
‘category’: ‘[Server Variable]’, // Product category – Type: string
‘brand’: ‘[Server Variable]’, // Product brand – Type: string
‘variant’: ‘[Server Variable]’, // Variant of the product like color, size etc – Type: string
});
ga(‘ec:setAction’, ‘detail’);
});
ga(‘send’, ‘pageview’);
</script>
- ga(‘ec:addProduct’,productFieldObject); là lệnh enhanced ecommerce được sử dụng để thu thập và lưu trữ tất cả dữ liệu sản phẩm (trừ dữ liệu hiển thị sản phẩm.
- ga(‘ec:setAction’, ‘detail’); đây là lệnh enhanced ecommerce được sử dụng để đo lường số lần xem trang sản phẩm chi tiết.
6. Đo lường thêm sản phẩm vào giỏ hàng
Trong quá trình mua sắm, người dùng có thể quyết định mua một sản phẩm, vì vậy họ sẽ thêm sản phẩm vào giỏ hàng. Bạn có thể thêm đoạn script sau vào nút thêm vào giỏ hàng trên trang sản phẩm chi tiết.<script>
(function(i,s,o,g,r,a,m){i[‘GoogleAnalyticsObject’]=r;i[r]=i[r]||function(){
(i[r].q=i[r].q||[]).push(arguments)},i[r].l=1*new Date();a=s.createElement(o),
m=s.getElementsByTagName(o)[0];a.async=1;a.src=g;m.parentNode.insertBefore(a,m)
})(window,document,‘script’,‘//www.google-analytics.com/analytics.js’,‘ga’);
ga(‘create’, ‘UA-XXXXX-YY’, ‘auto’);
ga(‘require’, ‘ec’);
// Called when a product is added to a shopping cart.
function addToCart(product) {
ga(‘ec:addProduct’,{
// productFieldObject stores product click and other details
‘id’: ‘[Server Variable]’, // Product ID/SKU – Type: string
‘name’: ‘[Server Variable]’, // Product name – Type: string
‘category’: ‘[Server Variable]’, // Product category – Type: string
‘brand’: ‘[Server Variable]’, // Product brand – Type: string
‘variant’: ‘[Server Variable]’, // Variant of the product like color, size etc – Type: string
‘price’: [Server Variable], // Product price – Type: numeric
‘quantity’: [Server Variable], // Product quantity – Type: numeric
});
ga(‘ec:setAction’, ‘add’); // measure product add to cart
ga(‘send’, ‘event’, ‘enhanced ecommerce’, ‘button click’, ‘add to Cart’); // Send ‘add to cart’ using an event.
}
ga(‘send’, ‘pageview’);
</script>
- ga(‘ec:setAction’, ‘add’); là lệnh enhanced ecommerce được sử dụng để để đo sản phẩm được thêm vào giỏ hàng.
7. Đo lường xóa sản phẩm khỏi giỏ hàng
Trong quá trình mua hàng, người dùng có thể quyết định không mua một sản phẩm, và xóa sản phẩm khỏi giỏ hàng. Mã hoàn chỉnh có thể giống như dưới đây:<script>
(function(i,s,o,g,r,a,m){i[‘GoogleAnalyticsObject’]=r;i[r]=i[r]||function(){
(i[r].q=i[r].q||[]).push(arguments)},i[r].l=1*new Date();a=s.createElement(o),
m=s.getElementsByTagName(o)[0];a.async=1;a.src=g;m.parentNode.insertBefore(a,m)
})(window,document,‘script’,‘//www.google-analytics.com/analytics.js’,‘ga’);
ga(‘create’, ‘UA-XXXXX-YY’, ‘auto’);
ga(‘require’, ‘ec’);
// Called when a product is removed from a shopping cart.
function removeFromCart(product) {
ga(‘ec:addProduct’,{
// productFieldObject stores product click and other details
‘id’: ‘[Server Variable]’, // Product ID/SKU – Type: string
‘name’: ‘[Server Variable]’, // Product name – Type: string
‘category’: ‘[Server Variable]’, // Product category – Type: string
‘brand’: ‘[Server Variable]’, // Product brand – Type: string
‘variant’: ‘[Server Variable]’, // Variant of the product like color, size etc – Type: string
‘price’: [Server Variable], // Product price – Type: numeric
‘quantity’: [Server Variable], // Product quantity – Type: numeric
});
ga(‘ec:setAction’, ‘remove’); // measure product remove from cart
ga(‘send’, ‘event’, ‘enhanced ecommerce’, ‘button click’, ‘remove from Cart’); // Send ‘remove from cart’ using an event.
}
ga(‘send’, ‘pageview’);
</script>
- ga(‘ec:setAction’, ‘remove’); là lệnh enhanced ecommerce được sử dụng để đo lường sản phẩm bị loại bỏ khỏi giỏ hàng.
8. Đo lường bước thanh toán đầu tiên
Trong quá trình mua sắm, người dùng có thể quyết định thoanh toán, và hoàn tất các bước khác nhau trong quá trình này. Để đo bước thanh toán đầu tiên, sử dụng lệnh ec:addProduct command cho sản phẩm được thêm vào giỏ hàng và lệnh ec:setAction. Đặt loại hành động là ‘checkout’ và ‘step field’ là số bước. Mã hoàn chỉnh có thể giống như dưới đây:<script>
(function(i,s,o,g,r,a,m){i[‘GoogleAnalyticsObject’]=r;i[r]=i[r]||function(){
(i[r].q=i[r].q||[]).push(arguments)},i[r].l=1*new Date();a=s.createElement(o),
m=s.getElementsByTagName(o)[0];a.async=1;a.src=g;m.parentNode.insertBefore(a,m)
})(window,document,‘script’,‘//www.google-analytics.com/analytics.js’,‘ga’);
ga(‘create’, ‘UA-XXXXX-YY’, ‘auto’);
ga(‘require’, ‘ec’);
/**
* Called when the user clicks on the ‘checkout’ button
*/
function checkout(cart) {
for(var i = 0; i < cart.length; i++) {
var product = cart[i];
ga(‘ec:addProduct’, {
‘id’: product.id,
‘name’: product.name,
‘category’: product.category,
‘brand’: product.brand,
‘variant’: product.variant,
‘price’: product.price,
‘quantity’: product.qty
});
}
ga(‘ec:setAction’,‘checkout’, {‘step’: 1}); // the value of 1 indicates first checkout step.
}
ga(‘send’, ‘pageview’);
</script>
9. Đo lường bước thanh toán thứ hai và kế tiếp
Tương tự để đo lường bước thanh toán thứ 2 và sau đó, bạn có thể sử dụng use ga(‘ec:setAction’,’checkout’, {‘step’: 2});, Ví dụ như bước thứ 3 sẽ là: use ga(‘ec:setAction’,’checkout’, {‘step’: 3}); Mã hoàn chỉnh có thể giống như dưới đây:<script>
(function(i,s,o,g,r,a,m){i[‘GoogleAnalyticsObject’]=r;i[r]=i[r]||function(){
(i[r].q=i[r].q||[]).push(arguments)},i[r].l=1*new Date();a=s.createElement(o),
m=s.getElementsByTagName(o)[0];a.async=1;a.src=g;m.parentNode.insertBefore(a,m)
})(window,document,‘script’,‘//www.google-analytics.com/analytics.js’,‘ga’);
ga(‘create’, ‘UA-XXXXX-YY’, ‘auto’);
ga(‘require’, ‘ec’);
/**
* Called when the user moves to the next checkout step
*/
function checkout(cart) {
for(var i = 0; i < cart.length; i++) {
var product = cart[i];
ga(‘ec:addProduct’, {
‘id’: product.id,
‘name’: product.name,
‘category’: product.category,
‘brand’: product.brand,
‘variant’: product.variant,
‘price’: product.price,
‘quantity’: product.qty
});
}
ga(‘ec:setAction’,‘checkout’, {‘step’: [step number]});
}
ga(‘send’, ‘pageview’);
</script>
10. Đo lường các tùy chọn thanh toán
Sẽ rất hữu ích khi đo lường thêm các tùy chọn thanh toán như phương thức thanh toán. Mã ví dụ:// Called when user selects a payment option.
function onPaymentSelection(stepNumber, optionSelected) {
ga(‘ec:setAction’, ‘checkout_option’, {
‘step’: 2,
‘option’:’visa’
});
ga(‘send’, ‘event’, ‘enhanced ecommerce’, ‘checkout_option’, ‘visa’,2);
}
<script>
(function(i,s,o,g,r,a,m){i[‘GoogleAnalyticsObject’]=r;i[r]=i[r]||function(){
(i[r].q=i[r].q||[]).push(arguments)},i[r].l=1*new Date();a=s.createElement(o),
m=s.getElementsByTagName(o)[0];a.async=1;a.src=g;m.parentNode.insertBefore(a,m)
})(window,document,‘script’,‘//www.google-analytics.com/analytics.js’,‘ga’);
ga(‘create’, ‘UA-XXXXX-YY’, ‘auto’);
ga(‘require’, ‘ec’);
// Called when user provides additional information.
function onAdditionalInformation(stepNumber, optionSelected) {
ga(‘ec:setAction’, ‘checkout_option’, {
‘step’: [stepNumber],
‘option’: [optionSelected]
});
ga(‘send’, ‘event’, ‘enhanced ecommerce’, ‘checkout_option’, [optionSelected],[stepNumber]);
}
ga(‘send’, ‘pageview’);
</script>
11. Đo lường mua hàng
Trong quá trình mua hàng, người dùng hoàn tất quá trình thanh toán bằng cách mua hàng. Sử dụng mã theo dõi sau trên trang xác nhận thanh toán:<script>
(function(i,s,o,g,r,a,m){i[‘GoogleAnalyticsObject’]=r;i[r]=i[r]||function(){
(i[r].q=i[r].q||[]).push(arguments)},i[r].l=1*new Date();a=s.createElement(o),
m=s.getElementsByTagName(o)[0];a.async=1;a.src=g;m.parentNode.insertBefore(a,m)
})(window,document,‘script’,‘//www.google-analytics.com/analytics.js’,‘ga’);
ga(‘create’, ‘UA-XXXXX-YY’, ‘auto’);
ga(‘require’, ‘ec’);
ga(‘ec:addProduct’,{
// productFieldObject stores product click and other details
‘id’: ‘[Server Variable]’, // Product ID/SKU – Type: string
‘name’: ‘[Server Variable]’, // Product name – Type: string
‘category’: ‘[Server Variable]’, // Product category – Type: string
‘brand’: ‘[Server Variable]’, // Product brand – Type: string
‘variant’: ‘[Server Variable]’, // Variant of the product like color, size etc – Type: string
‘price’: [Server Variable], // Product price – Type: numeric
‘quantity’: [Server Variable], // Product quantity – Type: numeric
});
// Transaction level information is provided via actionFieldObject.
ga(‘ec:setAction’, ‘purchase’,{
// actionFieldObject stores action data
‘id’: ‘[Server Variable]’, // Transaction id – Type: string
‘affiliation’: ‘[Server Variable]’, // Store name – Type: string
‘revenue’: ‘[Server Variable]’, // Total Revenue – Type: numeric
‘tax’: ‘[Server Variable]’, // Tax – Type: numeric
‘shipping’: ‘[Server Variable]’, // Shipping – Type: numeric
‘coupon’: ‘[Server Variable]’ // Order/Transaction coupon – Type: string
});
ga(‘send’, ‘pageview’);
</script>
12. Đo lường hoàn tiền
Khi quá trình mua hàng kết thúc, người dùng có thể yêu cầu hoàn tiền lại. Bạn có thể cung cấp hoàn tiền lại toàn bộ hoặc một phần. Để đo lường tác động của hoàn tiền đối với hoạt động kinh doanh của bạn, bạn cần nhập dữ liệu hoàn tiền vào GA web property. Bạn cũng có thể nhập dữ liệu hoàn tiền bằng tay bằng tính năng Nhập dữ liệu của Google Analytics thông qua API. Sau khi nhập lên hoàn tất thì bạn có thể xem dữ liệu trong báo cáo hiệu suất bán hàng của bạn. Lưu ý, bạn không thể xóa hoặc sửa đổi dữ liệu sau khi sau khi tải lên GA. Do đó, bạn cần phải kiểm tra kỹ trước khi tải lên. Và đoạn code hoàn chỉnh của hoàn tiền lại toàn bộ như sau:<script>
(function(i,s,o,g,r,a,m){i[‘GoogleAnalyticsObject’]=r;i[r]=i[r]||function(){
(i[r].q=i[r].q||[]).push(arguments)},i[r].l=1*new Date();a=s.createElement(o),
m=s.getElementsByTagName(o)[0];a.async=1;a.src=g;m.parentNode.insertBefore(a,m)
})(window,document,‘script’,‘//www.google-analytics.com/analytics.js’,‘ga’);
ga(‘create’, ‘UA-XXXXX-YY’, ‘auto’);
ga(‘require’, ‘ec’);
// Refund an entire transaction.
ga(‘ec:setAction’, ‘refund’, {
‘id’: ‘43545232’ // Transaction id – Type: string – Required field
});
ga(‘send’, ‘pageview’);
</script>
<script>
(function(i,s,o,g,r,a,m){i[‘GoogleAnalyticsObject’]=r;i[r]=i[r]||function(){
(i[r].q=i[r].q||[]).push(arguments)},i[r].l=1*new Date();a=s.createElement(o),
m=s.getElementsByTagName(o)[0];a.async=1;a.src=g;m.parentNode.insertBefore(a,m)
})(window,document,‘script’,‘//www.google-analytics.com/analytics.js’,‘ga’);
ga(‘create’, ‘UA-XXXXX-YY’, ‘auto’);
ga(‘require’, ‘ec’);
// Refund a single product.
ga(‘ec:addProduct’, {
‘id’: ‘PD3441’, // // Product ID/SKU – Type: string – required field
‘quantity’: 1 // // Product quantity – Type: numeric – required field
});
ga(‘ec:setAction’, ‘refund’, {
‘id’: ‘43545232’ // Transaction id – Type: string – Required field
});
ga(‘send’, ‘pageview’);
</script>
Thực hiện theo dõi enhanced ecommerce trên website của bạn
Bước 1: Thêm yêu cầu enhanced ecommerce vào mã theo dõi
Thêm yêu cầu enhanced ecommerce vào mã theo dõi trên những trang của website bạn để theo dõi những hoạt động mua sắm quan trọng nhất.Bước 2: Bật Enhanced ecommerce và đặt tên các bước thanh toán trong GA
Truy cập vào “Admin” Google Analytics của bạn, nhấp vào “Ecommerce Settings“, “Enable Ecommerce” và “Enhance Ecommerce Reporting“.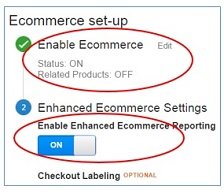 Đặt tên mô tả cho từng bước thanh toán của bạn:
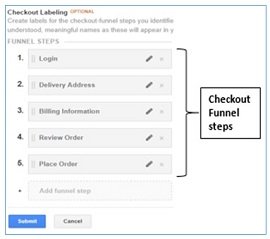 Lưu ý: Nếu bạn không cấu hình tên các bước thanh toán thì bạn sẽ chỉ thấy một bước gọi là “Step 1” trong báo cáo Phân tích hành vi thanh toán. Nếu website của bạn chỉ có 1 bước thanh toán thì bạn không cần phải thực hiện bước này.
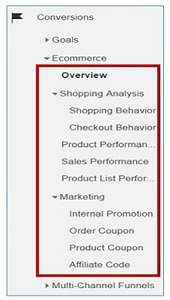
Một khi bạn đã bật “enhanced ecommerce reporting” thì bạn có thể xem báo cáo trong Conversions > Ecommerce trong GA của bạn.
